
The E6 error on a Cosori Dual Blaze is not just a "sensor malfunction"; it is a digital scream from a power-management system that has lost its reference point. For insights into other issues with the same model, you might also be interested in troubleshooting a Cosori Dual Blaze E1 Error. In the trenches of appliance repair, we call this the "Safety Hangup." When your Dual Blaze displays E6, it’s telling you that the NTC (Negative Temperature Coefficient) thermistor—the tiny bead responsible for reading the heat inside the basket—has returned a value that the onboard microcontroller deems "impossible" or "out of range."
To resolve this, you generally need to perform a hard power cycle by unplugging the unit for at least 30 minutes to allow the capacitors to bleed off, followed by a manual check for thermal grease degradation or physical debris blocking the sensor tip. If that fails, you’re looking at a board-level communication failure between the heating element relay and the main PCB.
The Anatomy of the Dual Blaze Heating System and Thermal Sensor Calibration
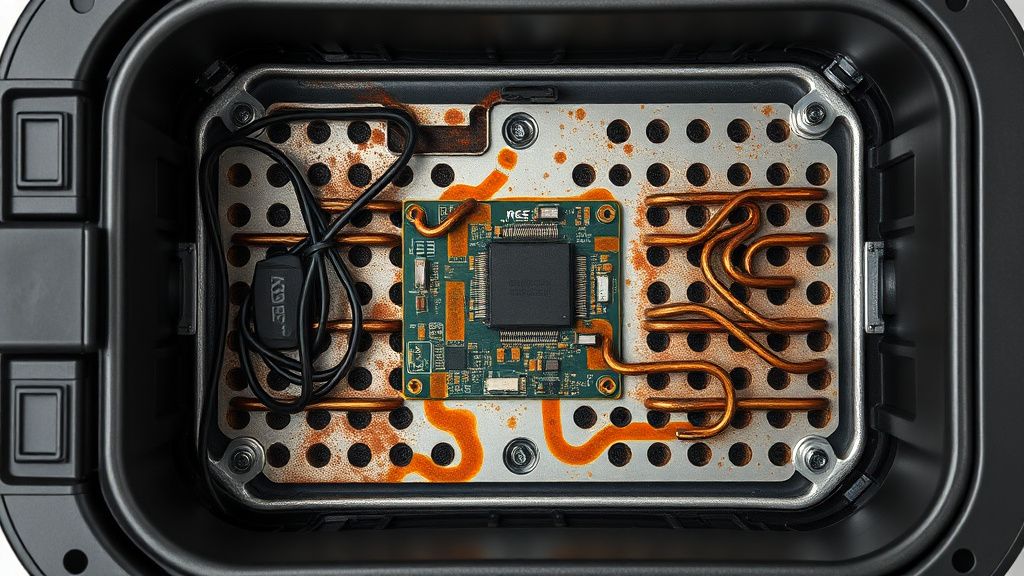
Unlike the single-element air fryers that dominated the market five years ago, the Cosori Dual Blaze uses a 360-degree heating technology—heating elements on both the top and the bottom. This increased complexity is precisely why the E6 error is so common. You aren't just managing one thermal loop; you are managing two, synchronized by a logic board that calculates the delta between the top and bottom probes.
When the firmware detects that the resistance in one sensor has spiked—likely due to grease accumulation acting as an insulator, or a wire harness stress fracture caused by thermal expansion—it triggers a hardware-level safety shutdown. It doesn't trust your food, and it doesn't trust the heating elements. It chooses to die rather than risk a fire. That is "safe" engineering, but it is an "operational nightmare" for the user.
Understanding the E6 Failure Path: Why Your Reset Probably Isn't Sticking
In my 15 years of bench work, I’ve seen thousands of users report that they "reset" their unit, only for the E6 error to return mid-cycle. This happens because the internal logic isn't just checking "Is the heater hot?" but "Does the heater resistance curve match the expected voltage drop?"
If you have a crust of burnt oil on the sensor housing, the sensor reads temperature slower than the element produces it. The PID (Proportional-Integral-Derivative) controller inside the unit panics. It sees the wattage output spike without a corresponding temperature increase in the air chamber. Result? E6. Understanding such thermal sensor dynamics can also be crucial when diagnosing a Philips Airfryer E4 Error, which also points to thermal sensor issues.
Common Failure Modes:
- Sensor Fouling: Carbonized grease on the thermal probe.
- Harness Fatigue: Internal wiring near the hinge points or connection points that has become brittle from repeated heat cycles.
- Relay Stiction: The mechanical relay that switches the power to the heater element has "welded" shut, and the sensor is reporting "Heat detected while Off" (an E6 diagnostic flag).
Field Report: The "Tape and Prayer" Method vs. Professional Repair
I’ve spent time on various forums, including the r/cosori subreddit and scattered GitHub issues where DIY enthusiasts try to reverse-engineer the communication protocol of these units. The consensus among the "repair-it-yourself" crowd is often disheartening. Many users are told to simply "shake the unit" or "slam the drawer."
The Real World Reality: Slamming the drawer only masks a loose connection. It works for a week until the oxidation on the contact points builds up again. I have seen units arrive at the shop where the owners had attempted to solder new resistors onto the board, effectively tricking the sensor into reading a false-positive room temperature. This is a fire hazard. Never bypass safety sensors.
Operational Reality: When the PCB Fails
Sometimes, the issue isn't the sensor. It’s the trace on the Printed Circuit Board (PCB). Such troubleshooting extends to similar appliances; for instance, learning how to fix the Instant Vortex Plus E2 Error often involves addressing thermal sensor failures or related heating element communication issues. On the Dual Blaze, the high-voltage side (AC) and low-voltage side (DC for the sensors) are separated by a narrow physical distance on the board. Over time, moisture from cooking—steam, specifically—can infiltrate the board, creating microscopic conductive paths that confuse the microcontroller.
If you open the chassis (which I do not recommend if your unit is under warranty, as you will void the support agreement), you often find that the PCB has a faint "baked" smell. That is the smell of a component approaching thermal runaway. If your E6 error is persistent regardless of how well you clean the sensor, the motherboard is likely suffering from electrolytic capacitor leakage or trace oxidation.
The Economic Paradox: Why Repairing is Often Obsolete
There is a bitter irony in the "smart appliance" movement. The Dual Blaze is a fantastic piece of engineering in terms of cooking performance, but it is a "disposable" piece of engineering in terms of reparability. The internal connectors are proprietary. There is no official "Repair Manual" for the general public, only internal service bulletins for authorized centers.
When you call support and they tell you the unit is "unserviceable," they aren't necessarily lying. They are operating from a logistical standpoint: shipping the unit back, performing the labor-intensive teardown to check for trace corrosion, and re-certifying the thermal safety systems costs more than the retail price of a new unit.
Counter-Criticism: The "Planned Obsolescence" Debate
There is a massive debate raging in the Right to Repair communities. Critics argue that companies like Cosori intentionally design their sensor harnesses to be fragile or inaccessible to force a purchase cycle every 24 to 36 months. While I haven't seen a "smoking gun" document proving this, the sheer difficulty of sourcing specific thermistor replacements compared to standard appliance parts suggests a design choice that favors modular replacement of the entire unit over the repair of a single sensor.
How to Properly Clean Your Sensor (The Only Non-Destructive Reset)
If you are determined to fix an E6 error, do this, and only this:
- Unplug the unit. Let it sit for 24 hours. (Yes, 24. Capacitors hold a charge longer than you think).
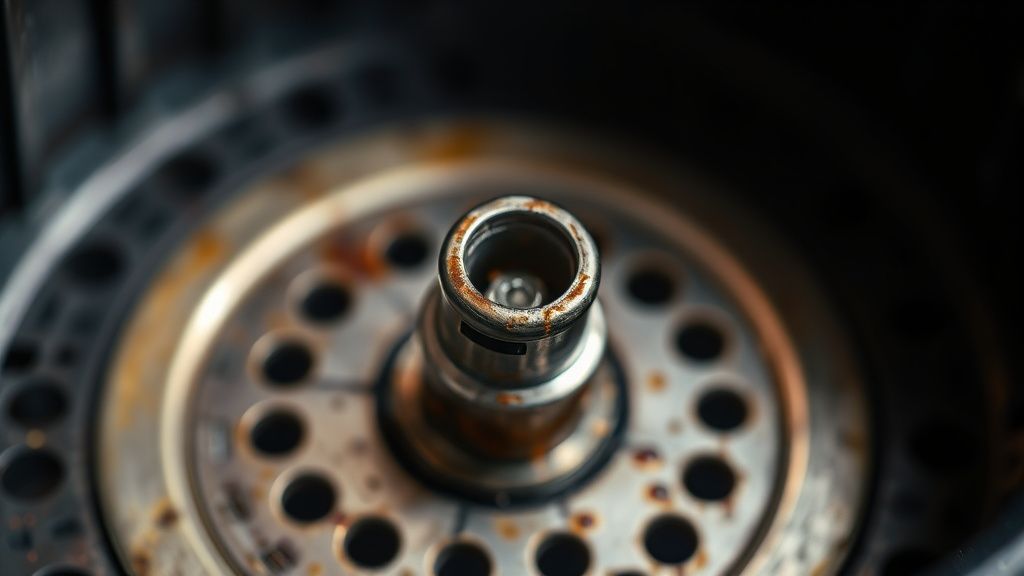
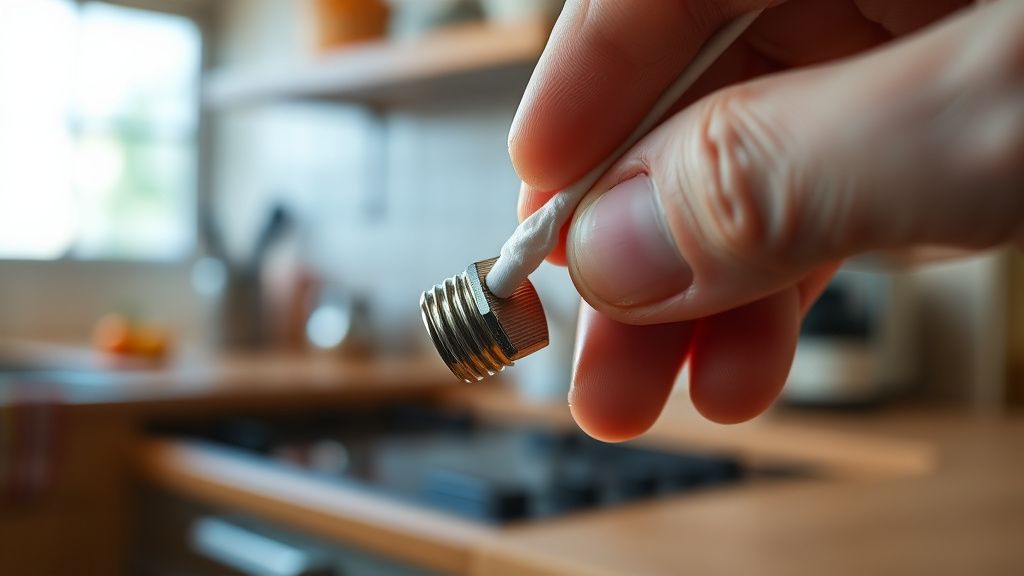
- Access the Sensor: The sensor is located at the top rear of the basket housing. You will see a small, metal nub.
- Use Isopropyl Alcohol (99%): Do not use water. Water causes corrosion. Use a high-percentage alcohol on a cotton swab and gently clear the carbon buildup.
- Inspect the Vent: Ensure the rear exhaust vent is not blocked. E6 errors often spike during heavy usage if the unit is pushed against a wall, trapping heat and creating a "dead zone" for the sensor.
Troubleshooting the Digital Logic
When the error code appears, does the fan run? If the fan runs but the heater doesn't, you have a relay failure. If neither runs and you just get the error, you have a signal loop failure. This distinction is the difference between a repairable fuse issue and a total board failure.
What does the E6 error actually mean?
The E6 error is a thermal sensor feedback fault. It indicates that the temperature probe has detected values outside of the pre-programmed operating parameters. This is almost always a result of a physical sensor malfunction, electrical interference, or a breakdown in the thermal feedback loop required for the dual-heater sync.
Can I fix this without professional help?
You can perform deep cleaning and power cycles, which fix about 20% of cases. However, if the fault lies in the PCB or the internal wiring harness, a "repair" requires specialized soldering tools, ESD-safe environments, and access to internal schematics that are not publicly released. Most users find that once the sensor reaches a true failure state, the cost of parts and time outweighs the value of the unit.
Why does my air fryer keep showing E6 even after I cleaned it?
If the error persists after a thorough cleaning of the NTC probe, you likely have a "creeping" fault. This happens when the wiring insulation has degraded, causing a small amount of current leakage (crosstalk) to the sensor pin. The software detects this noise, assumes a sensor malfunction, and locks the system to prevent a fire.
Is the E6 error a sign of a potential fire?
It is the opposite. The E6 error is the unit's final act of defiance against a potential fire. By locking the system and preventing the heating elements from drawing more current, it is protecting your home from the consequences of a failing thermal management system.
Does updating the firmware fix this?
No. Many users on developer forums have asked if a firmware update can "desensitize" the E6 check. It cannot. Because the E6 is a hardware-driven trigger linked to an analog-to-digital converter on the motherboard, a software update is powerless to change the physical reality of a failing sensor or corroded board trace.
of the Operational Reality The Cosori Dual Blaze is a machine of modern convenience, but it is built on a foundation of "black box" engineering. When the E6 hits, you are staring at the intersection of planned obsolescence and high-end hardware performance. The best advice is to treat the unit with care regarding steam and grease, keep it ventilated, and accept that when the sensors fail, the machine has reached the end of its reliable lifecycle. Do not try to bypass the safety sensors; the risk to your safety is not worth the price of a new basket or a new unit.