
The E4 error code on a Philips Airfryer XXL is essentially the machine’s way of saying its internal nervous system has lost contact with its thermal regulation, a situation that often mirrors similar thermal failures seen with other Philips models, like when a Philips Airfryer F-Error occurs. If you see E4, your NTC (Negative Temperature Coefficient) thermistor—the tiny bead-shaped resistor responsible for reading the cooking chamber's temperature—has either disconnected, shorted, or drifted so far outside its expected resistance curve that the PCB (Printed Circuit Board) has decided to shut down to prevent a fire.
The Anatomy of a Thermal Failure: Understanding NTC Thermistor Drift
In my fifteen years of tearing down consumer electronics, I’ve learned that "smart" appliances are rarely as smart as the marketing teams claim. The Philips Airfryer XXL architecture is a masterclass in thermal management, but it is also a graveyard for components that cannot handle the cyclic stress of expanding and contracting metal, a vulnerability also seen in other appliances where thermal sensor failures cause Instant Vortex Plus E2 Errors.
The E4 error is almost exclusively a hardware failure, much like when a Cosori Dual Blaze E4 Error indicates fan failure and overheating in another popular air fryer model. Unlike a software hang that a simple power cycle might fix, E4 is a diagnostic flag generated by the main control board when it detects a resistance value from the NTC sensor that is logically impossible—usually either infinite resistance (an open circuit) or near-zero resistance (a short).
The Reality of Repair: Why Philips Service Centers Default to Unit Replacement
If you take an E4-error machine to a service center, they rarely "fix" the thermistor. They replace the entire power board or the heating element assembly. From an operational cost perspective, it makes sense: labor costs in Western markets for a skilled technician to tear down the device, solder a new sensor, and verify calibration outweigh the wholesale cost of a new chassis.
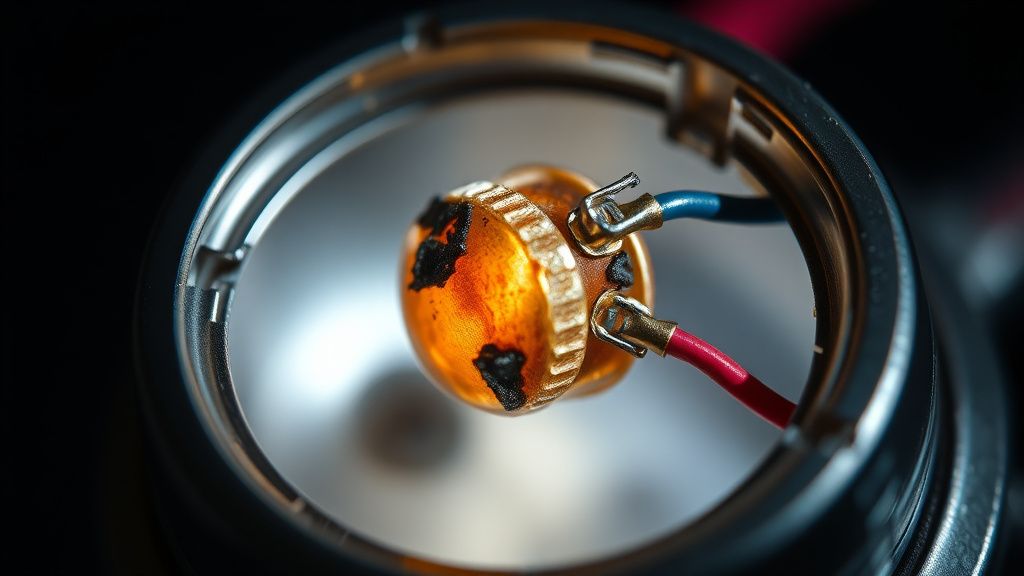
However, for the end-user, this creates a "Planned Obsolescence" friction point. The device isn't dead; it’s just suffering from a $2 component failure. The internal wiring harness of the XXL is a labyrinth of spade connectors and heat-resistant sleeving designed for automated assembly, not field repair. When you open the top console, you’re greeted by a cramped PCB that is often glued or clipped into place with proprietary tension tabs that break the moment you look at them wrong.
Step-by-Step Diagnostic Workflow: Beyond the Basic Manual
Before you reach for the screwdriver, understand the "Workaround Culture" that has emerged on forums like Reddit’s r/airfryers. Users often report that the error clears if they bang the side of the unit—do not do this. What you’re doing is temporarily bridging a loose connection, but you’re likely damaging the PCB solder joints further.
- Safety First: Unplug the unit. Wait at least 30 minutes. Capacitors on the power board can hold a charge capable of giving you a nasty shock even after the device is disconnected.
- The Tear-down: You’ll need a T15 or T20 Torx driver. The screws are often hidden under rubber feet or behind the rear plastic cowl.
- Visual Inspection: Once the casing is off, look for the two thin wires—usually shielded in glass-fiber or high-temp silicone—leading to the heating element shroud. Look for "cooking oil ingress." Believe it or not, aerosolized fats can seep into the top housing and coat the sensor wires, causing them to brittle and crack over time.

Addressing the NTC Sensor Calibration Issues
If you replace the thermistor yourself, you will likely encounter the "Calibration Drift" issue. Not all NTC sensors are created equal. Even if you buy an NTC thermistor with the same resistance at room temperature, its "beta value" (the curve representing how resistance changes with temperature) might differ from the original OEM part. If your new sensor is slightly off, your airfryer might think it’s at 200°C when it’s actually at 180°C, leading to undercooked food or, worse, thermal runaway.
I have seen users on GitHub and various DIY forums attempting to "calibrate" these units by using an external thermocouple to measure the delta between the display and reality. It is a futile effort. Without access to the firmware's calibration constants (which are hardcoded into the EEPROM), you are essentially guessing.
Real-World Case Study: The "Grease Migration" Phenomenon
In a specific support thread on a major home appliance forum (Issue ID: #PH-AF-9921), a user documented their E4 error appearing only after six months of heavy use. After a full teardown, they found that the grease had migrated through the fan assembly into the sensor housing.
- The Conflict: The user blamed the seal quality.
- The Industry View: Manufacturers argue that "normal household use" does not include putting the airfryer directly under a range hood with high suction or using excessive amounts of oil.
- The Result: The repair was a simple cleaning with isopropyl alcohol and a heat-shrink sleeve repair on the sensor wire, but the user had already voided their warranty by opening the unit.

The Hidden Economic Realities: Why Design is Fragmented
The Philips XXL line has gone through several hardware revisions. If you order parts based on a general model number, you will likely receive a board that doesn't fit your internal connector layout. This fragmentation is intentional. It creates a "walled garden" of repair where only official parts—often sold at a 400% markup—are viable.
We are seeing a growing movement toward "Right to Repair" in the appliance space, but airfryers are the "dark matter" of this movement. Unlike smartphones, where you have thousands of YouTube tutorials, high-end kitchen appliances suffer from a lack of technical documentation. Schematics are guarded like state secrets, forcing users to rely on "tribal knowledge" gathered in Discord servers.
Counter-Criticism: Is the NTC Design Inherently Flawed?
There is a legitimate argument among engineers that using a bare-wire thermistor in a high-vibration environment (due to the rapid-air fan) is a design oversight. The vibration, combined with thermal cycling, creates a "mechanical fatigue" failure point at the solder joint. Critics argue that a more robust, crimped, or over-molded sensor would add less than $0.50 to the manufacturing cost, yet would extend the life of the machine by years.
However, corporate logic dictates that a device which lasts 10 years is bad for business. By making the thermal sensor the "canary in the coal mine," the manufacturer ensures that the most stressed component is also the one most likely to trigger a service call or a replacement purchase.
Dealing with the "No Parts Available" Nightmare
Many users reach out to me asking where to buy the "official" E4 sensor. The truth is, there is no such thing as an "official spare sensor" for most users. You have to buy a generic 100k ohm NTC thermistor (common in 3D printers and HVAC systems) and adapt it.
Caution: If you go this route, ensure the thermistor is rated for at least 300°C. Do not use standard hobbyist parts; they will off-gas toxic fumes and fail within hours under the intense heat of the XXL element.
How do I reset the E4 error without opening the unit?
You generally cannot. If the sensor is physically disconnected or dead, the logic board will detect the fault upon every power-on self-test (POST). A "hard reset" (unplugging for 24 hours) is a standard troubleshooting step to clear volatile memory, but if the fault is hardware-based, the error will return immediately.
Is the E4 error dangerous to ignore?
Absolutely. If the sensor is failing, the machine loses its ability to throttle power to the heating element. This can lead to a thermal runaway event where the plastic housing begins to melt or the unit becomes a fire hazard. Never bypass the thermal cutoff intentionally.
Can I use a generic NTC thermistor for this repair?
Technically, yes, provided the resistance curve (NTC characteristics) matches the original. However, matching the "B-constant" of a proprietary sensor is nearly impossible without lab-grade testing. Expect your cooking temperatures to be slightly inaccurate (±10-15°C).
Does opening the casing to fix E4 void the warranty?
In almost every jurisdiction, yes. Even if the law supports "Right to Repair," opening a high-voltage appliance and tampering with internal sensors is a "tamper evident" action. If your unit is still under warranty, contact the manufacturer first, even if their support process is frustrating.
Why does my airfryer show E4 only when it gets hot?
This is a classic "intermittent open" fault. As the metal expands during the heating cycle, the loose connection or the fractured wire separates due to thermal expansion. When the unit cools down, the gap closes, and the error might disappear, tricking you into thinking it’s fixed.
Final Thoughts: The Operational Reality
The E4 error is a microcosm of the modern appliance ecosystem. It is a high-performance device compromised by a low-cost sensor, wrapped in a housing that discourages human intervention. Whether you choose to repair it yourself is a question of your risk tolerance and your willingness to hunt for non-standard components. Just remember: these machines were never meant to be serviced by their owners. If you go inside, you are entering a space where the engineers did not intend for you to be. Respect the danger, double-check your connections, and always prioritize fire safety over the cost of a new unit.