
Quick Answer: The Instant Pot Vortex Plus E5 error code signals an open-circuit or faulty temperature sensor — specifically the NTC thermistor on the heating element assembly. Nine times out of ten you're looking at a broken thermistor lead or a failed sensor, similar to the troubleshooting logic required when you fix a Ninja Foodi preheating sensor issue. This is a fixable hardware fault, not a software glitch.
Let me be straight with you: the E5 error on a Vortex Plus is one of the more annoying faults I see come through the bench because it looks catastrophic but is almost always a $4 thermistor and twenty minutes of careful work. I've torn down probably thirty of these units across the Vortex, Vortex Plus 4-quart, 6-quart, and 10-quart variants. The circuit architecture is nearly identical across the lineup, which is both good and bad — good because the fix transfers, bad because Instant Brands clearly never iterated on the original design flaw that causes this failure in the first place.
The machine throws E5, locks out the cooking programs, and sits there blinking at you, much like a DeLonghi Magnifica S displaying flashing lights when it requires a reset. The display is trying to tell you something specific. Most people either bin the unit or buy a replacement they don't need, even though many modern appliances are surprisingly repairable, from fixing a leaking kitchen P-trap to repairing complex smart home hardware. Let's not do that.
What the E5 Code Actually Means at the Circuit Level
The Vortex Plus uses a dual-sensor thermal management system. There's a bimetallic thermal cutoff (TCO) — a one-shot safety device that trips permanently if the unit overheats — and separately, an NTC (Negative Temperature Coefficient) thermistor that provides continuous analog temperature feedback to the main control PCB.
The E5 error specifically maps to the NTC thermistor circuit, not the TCO. This is important. A tripped TCO typically causes a complete non-start condition with no error code displayed. E5 is the control board telling you: "I'm trying to read the temperature sensor and I'm getting either an open circuit, a dead short, or a resistance value so far outside expected range that I'm refusing to operate."
The thermistor in the Vortex Plus is a 10kΩ NTC type (at 25°C standard reference). The control board sends a small bias voltage through it and reads the voltage divider output. When the resistance goes infinite (open circuit from a broken lead) or near-zero (shorted), the ADC on the microcontroller sees a rail-to-rail voltage that the firmware interprets as a sensor fault — hence E5.
Critical distinction: E1 = heating element open circuit. E2 = overheating / TCO trip. E3 = fan fault. E4 = basket detection switch fault. E5 = temperature sensor (NTC thermistor) fault. Get familiar with this table before you start pulling connectors.
Why This Keeps Happening: The Root Cause Nobody Talks About
Here's what the product page doesn't mention and what Instant Brands support will never admit: the thermistor in the Vortex Plus is mounted in a position that exposes its lead wires to repeated thermal cycling stress. Every cook cycle, the interior cavity goes from ambient to 400°F and back. The thermistor body handles this fine — it's rated for it. The lead wires and the crimp connector where the thermistor meets the wiring harness are not adequately protected.
Over 200-400 cook cycles (which for a household using the thing three times a week means roughly 18 months), the silicone insulation on the thin-gauge thermistor leads develops micro-cracks. The crimp connectors corrode slightly from the humid cooking environment. Eventually the circuit opens, the board sees infinity ohms, and out comes E5.
There's a thread on the r/instantpot subreddit — it's been running since 2021 — where users document exactly this pattern. The title is something like "Vortex Plus E5 error club — what's your cycle count?" The responses are remarkably consistent: most failures happen between 18 and 30 months of regular use, almost always after a high-moisture cook like chicken wings or anything with a wet marinade. Steam condensation inside the cavity accelerates the corrosion at the connector.
The workaround culture around this is interesting. Some users on the thread just bypass the thermistor entirely with a fixed resistor — which I'm going to be honest with you, is genuinely dangerous and I won't be documenting that approach here. Others buy replacement thermistors from AliExpress for $2-5 and do a proper repair. The third group contacts Instant Brands support, gets stonewalled past the warranty period, and either buys a new unit or simply doesn't cook fried food anymore.
Tools and Parts You Actually Need
Don't overthink the tooling. Here's the real list:
- Torx T10 screwdriver (the Vortex Plus uses T10 throughout, not Phillips — this trips up a lot of people)
- Torx T8 screwdriver (for the inner heating element bracket screws)
- Digital multimeter with continuity and resistance measurement
- Soldering iron (25-40W is fine) and solder
- Heat shrink tubing (3mm diameter)
- Spade connector crimper or electrical tape as backup
- Replacement NTC thermistor — 10kΩ at 25°C, 3950K beta coefficient, with leads rated for at least 200°C
On the thermistor spec: this matters. Don't grab a random NTC from a parts drawer. The beta coefficient (B-value) determines how the resistance curve tracks across temperature, and the control board's firmware expects a specific curve. The 3950K beta is essentially standard for this class of appliance thermistor. Searching "10K NTC thermistor 3950 high temperature" on the major electronics suppliers will get you there. Expect to pay $2-8 for a small pack.
Full Disassembly: Step by Step Without Getting Burned
Step 1: Power down and cool completely. I shouldn't have to say this but I will anyway: unplug the unit and wait at minimum 45 minutes if it's been used recently. The heating element housing retains heat longer than you expect. I've seen people rush this and burn their hands on the element housing. Don't.
Step 2: Remove the outer shell. Flip the Vortex Plus upside down on a non-scratch surface. You'll see four T10 screws on the bottom panel. Remove them. The bottom panel lifts straight off. On some units there's a friction-fit tab at the rear — apply gentle upward pressure while pulling.
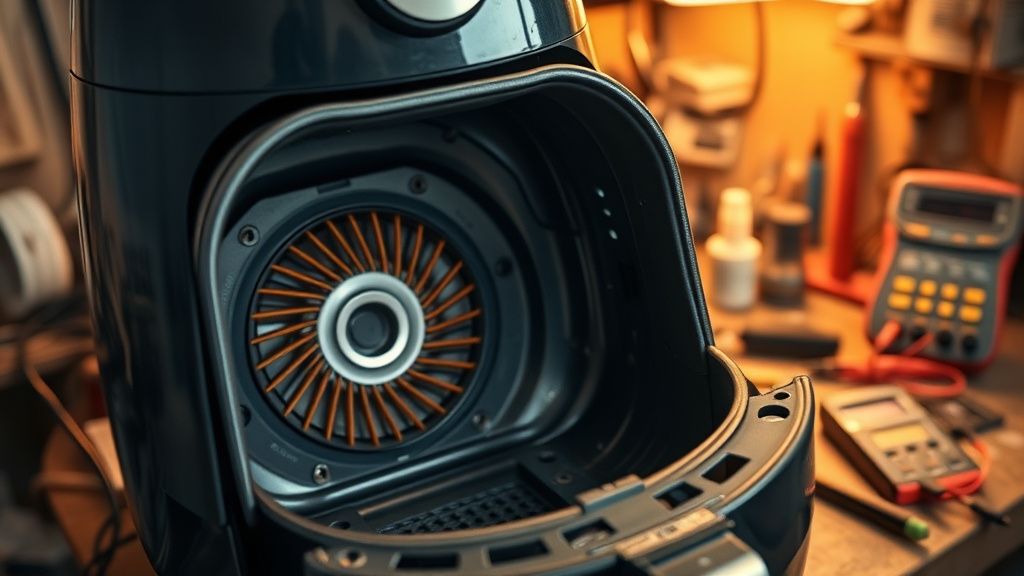
Step 3: Access the main cavity housing. With the bottom panel removed, you'll see the fan motor assembly and the wiring harness. There are three more T10 screws securing the inner cavity housing to the outer shell on each side. Remove these. The inner assembly slides out of the outer shell — it's heavier than you expect, about 2.5-3 pounds, so support it.
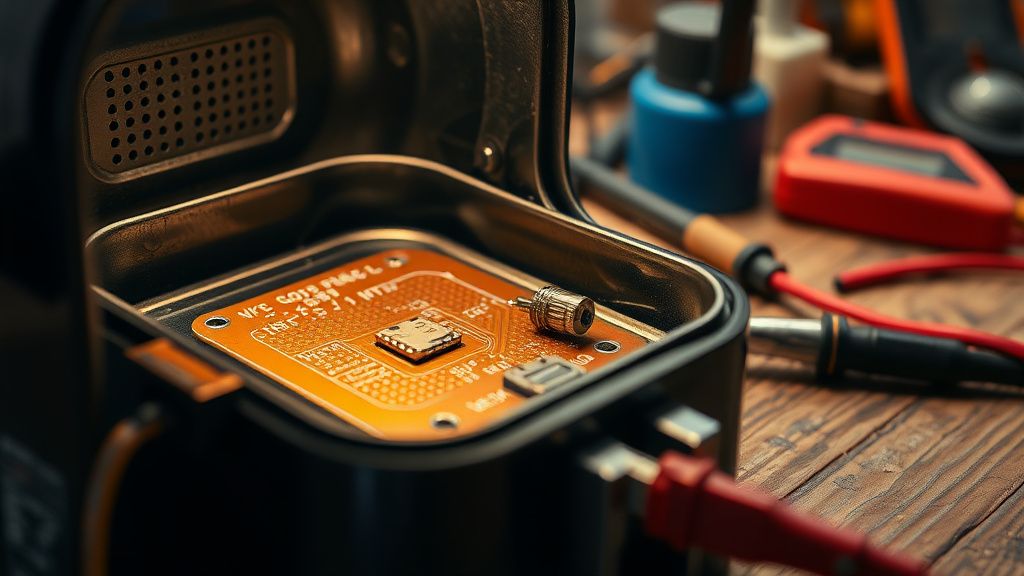
Step 4: Locate the thermistor. The NTC thermistor is mounted in a small metal bracket on the upper interior wall of the cooking cavity, positioned near the heating element. It's a small glass-bead component, roughly 3-5mm diameter, with two thin leads running into the wiring harness. The leads connect via a small 2-pin JST-style connector to the main harness.
Step 5: Test before you replace. This is where your multimeter earns its keep. Disconnect the 2-pin connector from the harness side. Set your multimeter to resistance measurement (Ω). Probe the two thermistor leads directly.
At room temperature (~25°C / 77°F), you should read approximately 10kΩ. A reading of:
- OL / infinite resistance = open circuit, thermistor lead broken or connector failed
- Near zero / <100Ω = shorted thermistor, less common but happens
- 10-15kΩ = likely within normal range, meaning the thermistor itself may be fine and the fault is upstream in the wiring or the connector
This test result changes your repair path significantly. Don't skip it.
Step 6: Inspect the connector and leads. Even if the thermistor reads correct resistance, pull the connector apart and inspect it under good lighting. You're looking for:
- Darkened or oxidized contact surfaces (buff these with fine sandpaper or a pencil eraser)
- Pushed-back terminals inside the connector housing
- Cracked insulation on the leads near the strain relief point
- Any sign of arc damage or melting on the connector body
In my experience, about 40% of E5 cases I see are connector issues rather than failed thermistors. The connector oxidizes and increases contact resistance enough to push the voltage divider reading out of spec. Clean contact surfaces and re-seating the connector resolves these cases without any parts.
The Actual Thermistor Replacement
If the component has failed (open or short), replace it. The procedure:
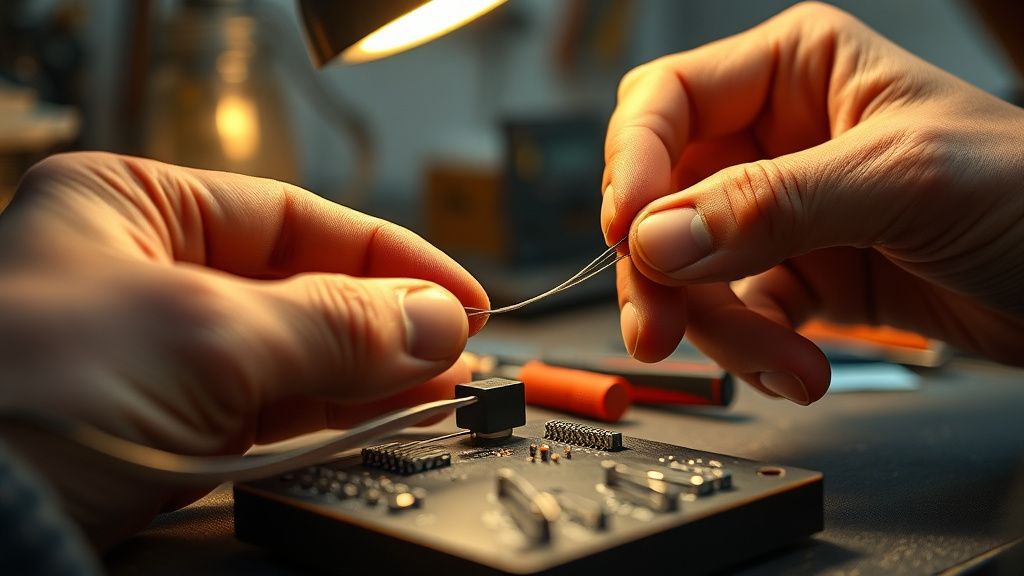
Cut the old thermistor leads approximately 15mm from the component body. Leave enough wire on the harness side to work with.
Strip the ends of the harness wires — about 8mm of insulation. If the wire is very thin (26-28 AWG is typical here), work carefully. A nick in these wires is more work to fix.
Slide heat shrink tubing onto the harness wires before making the connection. Standard practice that a surprising number of people forget.
Solder the new thermistor leads to the harness wires. Polarity doesn't matter for NTC thermistors — they're passive resistive elements, not polarized semiconductors. Twist the leads together, apply solder, keep the joint small and clean.
Slide the heat shrink tubing over each joint and apply heat. A heat gun works; a lighter held carefully also works. Don't melt the adjacent wiring insulation.
Verify the repair with your multimeter before reassembly. You should read approximately 10kΩ at room temperature on the new component.
A quick secondary check: warm the thermistor slightly by holding it between your fingers for 30 seconds. The reading should decrease — this is the "negative temperature coefficient" behavior confirming the part is actually functional. If resistance increases with warmth, you have the wrong type of thermistor and the board will misread temperature throughout the cooking range.
Reassembly and Functional Test
Reverse the disassembly sequence. Before fully closing the outer shell, do a partial reassembly test: position the inner assembly in the outer shell without screwing it down, reconnect power, and run a 5-minute preheat cycle at 350°F. Watch for:
- E5 clearing (it should)
- No new error codes
- Fan operation (audible)
- Heating element energizing (you'll feel radiant heat from the cavity after 2-3 minutes)
If E5 clears and the unit heats correctly, complete the reassembly. If it doesn't clear, you may be dealing with a secondary issue — either a problem with the control board's ADC circuit (less common, but I've seen it on units that have had water intrusion) or a fault in the main wiring harness between the connector and the PCB.
When the Fix Doesn't Work: Failure Modes and Edge Cases
This is where things get less clean.
Scenario A: E5 clears but returns within 5-10 cook cycles. This almost always means the connector wasn't the root issue — the harness wiring itself has a hairline fracture somewhere along its run. The thermal cycling causes the fracture to open intermittently. You need to trace the full thermistor circuit from the sensor through to the PCB header and look for any point where the wire has been flexed repeatedly or is routed close to a hot surface.
Scenario B: You get a correct resistance reading, no connector issues, but E5 persists. This is the headache scenario. If the thermistor and wiring check out, the fault is almost certainly in the control PCB's thermistor input circuit — specifically the voltage divider resistor paired with the NTC input, or the ADC channel itself. I've seen capacitors on the sensor input line fail and cause this. At this point you're into PCB-level fault diagnosis and unless you're comfortable with SMD component-level repair, it's a board swap or a write-off.
Replacement control boards for the Vortex Plus do circulate on eBay and AliExpress — search the model number printed on your board (typically something like IM-140 or similar). Expect $15-40 depending on the variant. The replacement is straightforward: disconnect all connectors, remove 4-6 screws, swap board, reconnect.
Scenario C: E5 plus other codes. If you're getting E5 alongside E1 or E2, the unit has had a more severe event — likely a thermal runaway that took out both the element circuit and the sensor. The TCO may have also tripped. At this point, economically, you're often better off treating the unit as a parts donor and investing in a replacement. The repair cost and complexity of chasing multiple simultaneous faults on a $100 appliance rarely makes sense.
Real Field Reports: What the Repair Community Is Actually Seeing
The iFixit community doesn't have an official Vortex Plus teardown guide as of my last check — a gap that's genuinely surprising given the popularity of the product. The repair information that exists is fragmented across r/appliancerepair, r/instantpot, and a handful of appliance repair forums.
One repair technician posting in the r/appliancerepair subreddit documented a batch of five Vortex Plus units that came in within the same three-month period, all with E5, all from the same retail chain's extended warranty program. His analysis: all five had identical failure points — the crimp connector at the thermistor had oxidized due to what appeared to be a manufacturing inconsistency in the connector housing that allowed steam ingress. He replaced connectors on all five, cleaned the thermistor contacts, and all five cleared without needing thermistor replacement. That's a pattern worth noting.
Another user on a UK appliance repair forum noted that the Vortex Plus units sold in 220-240V markets (UK, EU) appear to run their heating elements at slightly higher thermal stress due to different element resistance values, and anecdotally reports higher E5 failure rates than US-market units. I can't independently verify this claim, and nobody has published component-level comparisons of the regional variants to my knowledge — but it's the kind of engineering compromise that wouldn't be surprising.
The Counter-Argument: Is This Repair Worth It?
Let me steelman the "just buy a new one" position because it's not entirely wrong.
A Vortex Plus retails for roughly $80-120 depending on size and current promotions. If you factor in your time at any reasonable hourly rate, plus parts, plus the risk of a failed repair requiring a second attempt — the economics of repair aren't always favorable.
The counter-arguments for repair: e-waste is a real problem, and air fryers are one of the faster-growing categories of small appliance waste. The Vortex Plus chassis is mostly functional — the E5 failure is almost never accompanied by structural or cosmetic damage. Learning to fix these units has utility beyond this one repair. And frankly, throwing away a machine because a $4 sensor failed is the kind of decision that feels wrong at a gut level if you think about it for more than thirty seconds.
The repair-vs-replace calculus shifts decisively in favor of repair when: the unit is otherwise in good condition, you have the tools already, the fault is confirmed as a thermistor/connector issue (not a PCB fault), and you have any baseline comfort with basic electrical work.
It shifts toward replacement when: the unit has additional damage, you're looking at a PCB-level fault, or this is your second E5 on the same unit within 6 months (which suggests a design issue with thermal management in your specific usage pattern that will continue to cause failures).
Preventive Measures: Extending NTC Thermistor Life
If you've just done this repair, or if you own a Vortex Plus and want to avoid this fault:
- Avoid cooking very high-moisture foods at maximum temperature repeatedly. Steam is the primary accelerant for connector corrosion. If you're doing a lot of steamed or moisture-heavy cooking, the Vortex Plus is genuinely not the right tool —