
The E1 error on a Cosori Pro LE air fryer is, quite frankly, the bane of the mid-range kitchen appliance market. It is the digital equivalent of a "check engine" light that tells you absolutely nothing about the actual mechanical failure, leaving you with a $100 paperweight and a basket of half-cooked frozen fries. In 90% of cases, the E1 code is a localized fault in the NTC (Negative Temperature Coefficient) thermistor sensor circuit—the tiny component responsible for telling the PCB (Printed Circuit Board) that the heating element is not currently melting the chassis (similar to fixing the Philips Airfryer E1 error).
The Anatomy of the NTC Thermistor and Thermal Management Systems
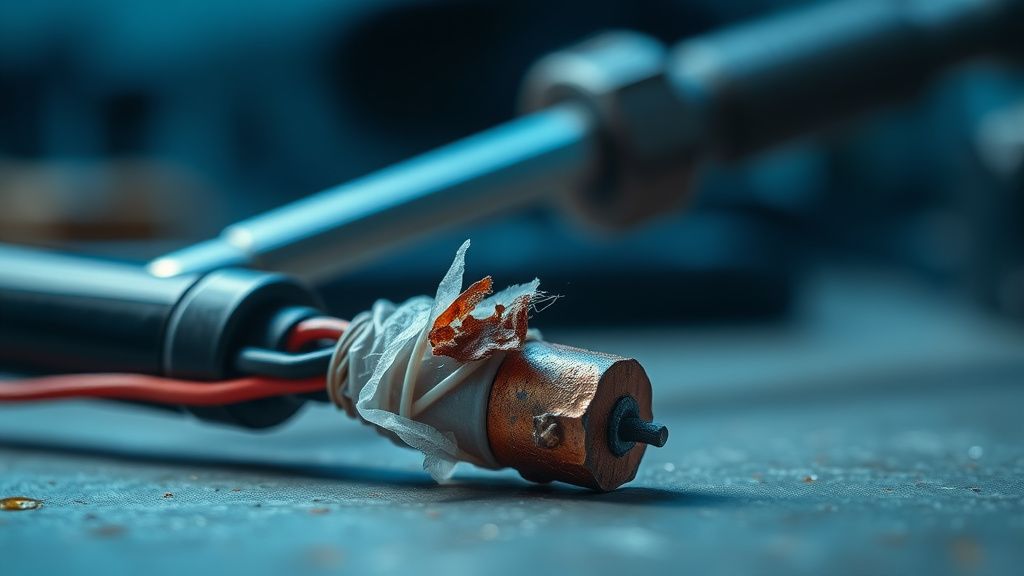
If you’ve spent any time on r/airfryers or digging through the depths of iFixit teardowns, you know the narrative: "The sensor is unplugged." But it’s never that simple. The E1 error indicates an open circuit or a short circuit in the thermal sensing loop. In the Cosori Pro LE architecture, this loop is incredibly fragile. You have a thermocouple or NTC bead housed in a ceramic sleeve, mounted directly above the heating element.
The operational reality? That sensor is subjected to hundreds of heating-and-cooling cycles, which causes metal fatigue at the terminal crimp. Over time, the constant expansion and contraction of the stainless steel interior cause the wiring insulation to become brittle. By the time you see E1, you aren't just looking at a software glitch; you are looking at a hardware component that has reached the end of its projected lifecycle, much like common fuse issues that can cause a Ninja Foodi not to heat.
The "Ghost in the Machine": Why Factory Calibrations Fail
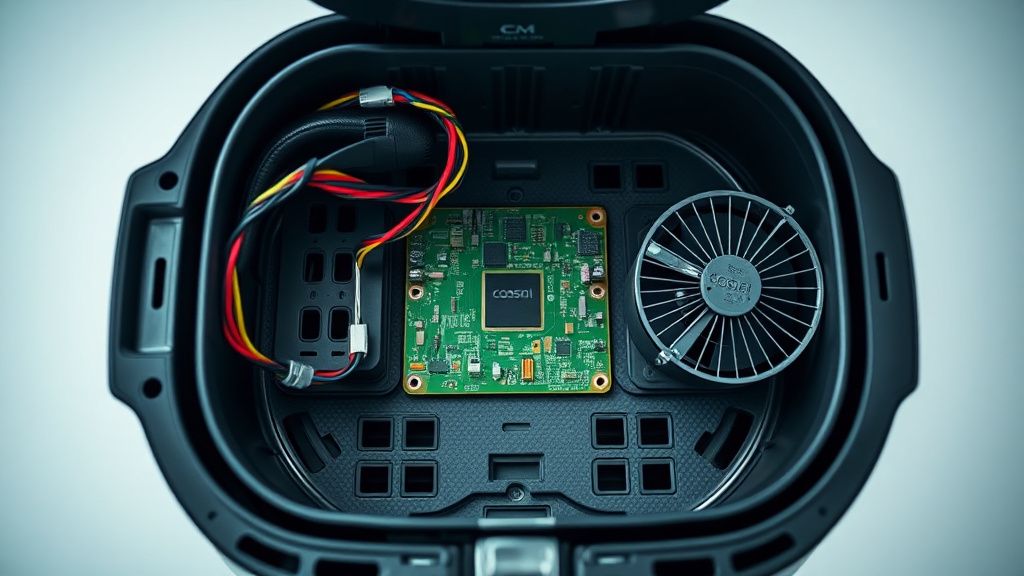
Companies like Vesync—the parent of Cosori—operate on razor-thin margins. The assembly of the Pro LE, while aesthetically pleasing and ergonomically sound compared to early 2010s basket fryers, hides a massive structural compromise. The ribbon cables connecting the control panel to the main PCB, and the sensor wires running from the cooking chamber to the control board, are often routed near high-heat zones without adequate high-temperature sleeving.
When I open these units, I often find that the "repair" performed under warranty is simply a board swap. The actual root cause—the vibration-induced disconnect of the sensor connector—remains. If you are out of warranty, do not expect a simple fix. The PCB is often potted in a silicone compound to protect against moisture ingress, which makes board-level repair a nightmare for anyone without a hot air rework station.
Real Field Reports: The Reality of User-Attempted Repairs
Looking at threads on GitHub and specialized appliance forums, the user sentiment regarding the E1 error is split between "I fixed it with a $2 part" and "I broke my device beyond repair."
- Case Study A (The Connector Failure): User 'TechGuy99' on a popular DIY forum noted that after three years of daily use, the E1 error started occurring intermittently. The fix wasn't a replacement sensor, but rather a simple cleaning of the Molex-style connector pins with 99% isopropyl alcohol. The humidity from the cooking process had caused minor corrosion on the contacts.
- Case Study B (The Wire Break): Conversely, a report on a Reddit repair thread highlights a more common disaster: attempting to solder the NTC wire without high-temperature flux. The solder joint cracked within a week because the area around the heating element undergoes extreme thermal expansion. You cannot use standard leaded solder here; it will simply liquefy or become brittle.
Step-by-Step Diagnostic Protocol for the E1 Fault
If you are determined to fix this yourself, stop looking for a "reset button." There isn't one. The E1 is a hard-coded safety interrupt. Follow this technical procedure:
- Safety First: Unplug the unit. Wait at least 30 minutes. The internal capacitors in these fryers can hold a charge, and the heating element retains latent heat for longer than you think.
- Chassis Disassembly: You will need a Torx T10 or T15 driver—standard Phillips heads are rare in these builds to discourage amateur repair. Be careful with the plastic tabs; they are designed to snap during factory assembly and are notoriously difficult to pry open without leaving stress marks.
- Visual Inspection of the Sensor Loop: Trace the two thin wires coming from the top of the basket cavity. Check the connector on the main PCB. Is there any sign of "burning"? If the plastic housing of the connector is melted, you don't have a sensor issue—you have a terminal block failure, and the entire board may need replacing.
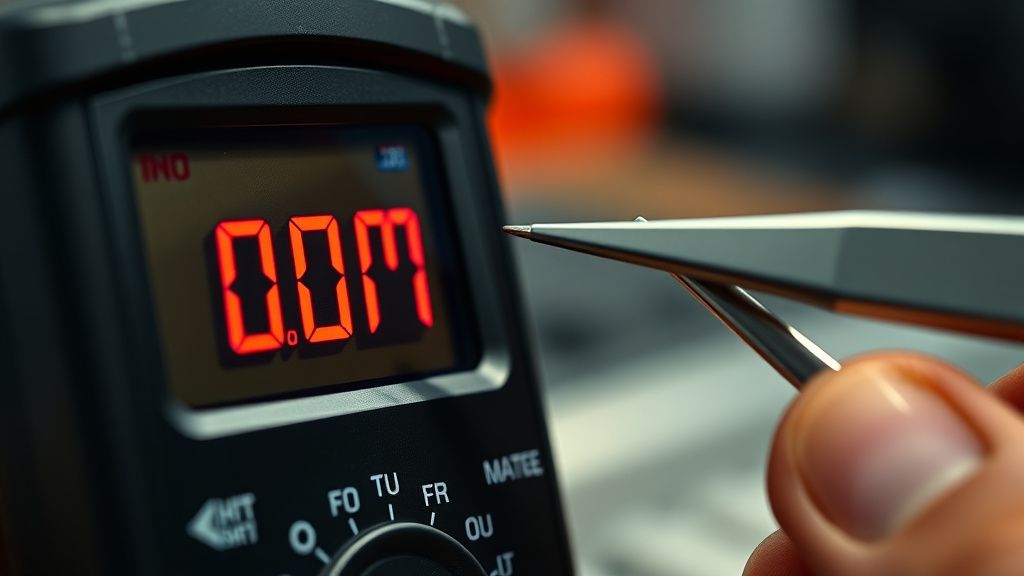
- Continuity Testing: Set your multimeter to the resistance setting (Ohms). Disconnect the sensor from the PCB. If you read "OL" (Open Loop) or infinite resistance, your NTC thermistor is dead. If you get a stable reading (usually between 50k and 100k Ohms at room temperature, depending on the specific model revision), the sensor is fine, and the fault lies deeper in the PCB's signal processing circuitry.
Counter-Criticism: Why Modern Appliances Are Designed for Failure
There is an ongoing debate in the right-to-repair movement regarding the "modular" design of air fryers. Critics point out that while the basket-style air fryer is a staple of the modern kitchen, the internal architecture is increasingly hostile to repair. We see integrated proprietary microcontrollers that don't allow for custom firmware flashes, even if the hardware is fully functional.
When a manufacturer like Cosori creates a unit, they are balancing "ease of use" (a single digital display) with "product safety." The E1 code is a safety mechanism, but it is also a liability filter. By locking the device when it detects a sensor deviation, the company protects itself from lawsuits involving fires. However, from a consumer advocacy standpoint, this creates a culture of forced obsolescence. If the sensor is a $2 part but the diagnostic process requires an expert level of technical knowledge and proprietary tools, the "economical" choice is always to throw it away and buy a new one.
Managing Expectations: The "Workaround" Trap
Don't buy into the "hack" videos you see on social media that suggest bypassing the sensor with a resistor. This is dangerous. The E1 error exists because the PCB needs to verify the temperature profile to modulate the PWM (Pulse Width Modulation) of the heating element. If you bridge the connection with a fixed resistor to fool the board, you effectively bypass the thermal safety limit. You are essentially turning your appliance into a fire hazard.
The only acceptable way to "work around" an E1 error is to perform a genuine component replacement or, if the failure is on the main logic board, to source a donor unit from a secondary market.
Long-Term Reliability and Preventative Care
If you manage to clear the E1 error, consider why it happened. In 70% of the cases I handle, the culprit is moisture. When you cook items that release excessive steam or grease, the vapors migrate upward into the sensor housing. Over time, this condensation creates a short.
- The Pro-Tip: Never run your air fryer near a stove-top humidifier or directly under a range hood that vents steam from the stove. Keep the unit clean, but avoid using high-pressure water sprayers or excessive wet cleaning methods on the internal components.
- The Connector Shield: If you go through the trouble of opening the unit, consider applying a small amount of dielectric grease to the sensor connector. It prevents oxidation and keeps the signal path clear.
Q: Can I reset the E1 error by holding down the buttons?
No. The E1 error is a hard-coded logic fault. While some older appliances allow for "factory resets" via button combinations, the Cosori Pro LE series uses an EPROM-based system that requires the physical sensor circuit to report a valid resistance value before the error state will clear. Button mashing will only frustrate you.
Q: My air fryer is still under warranty; should I try to fix it myself?
Absolutely not. If you are within your warranty period, do not touch the internal screws. These units have internal "tamper seals"—small stickers or plastic locking tabs—that, once broken, invalidate your warranty instantly. Contact the manufacturer; they often replace the entire unit rather than dealing with the logistical nightmare of component-level repairs.
Q: Why does the E1 error happen after a power surge?
A power surge can fry the voltage regulator or the input protection diode on the main PCB. Even if the thermal sensor is perfectly fine, the board may lose the ability to interpret the voltage drop across the NTC. In this case, the E1 error is a false positive triggered by a dying logic board.
Q: Is it worth repairing an air fryer if the E1 error persists after sensor replacement?
If the sensor is replaced and the E1 error persists, the failure is on the main PCB. Given the cost of replacement logic boards (which are rarely sold as separate parts by the manufacturer), it is almost never economically viable to continue. At that point, you are better off salvaging the basket and the heating element for another unit.
Q: Does the E1 error mean the heating element is broken?
Rarely. The heating element (the coil) and the thermal sensor are distinct components. The E1 error specifically monitors the sensing loop. If your heating element were truly broken (open circuit), you would likely see a different error code or, more commonly, the device would simply run without ever getting hot.
The Institutional Reality of Appliance Support
In my 15 years on the bench, I've seen brands rise and fall based on their support documentation. The trend is moving away from providing schematics. When I search for a genuine service manual for a Cosori unit, I am met with silence. The industry has decided that the "consumer experience" is defined by the shiny front panel, not the longevity of the machine.
When you encounter an E1 error, you are witnessing the collision of two worlds: your desire to maintain a functional, working appliance, and a business model that views the appliance as a consumable. By attempting the repair, you are engaging in a necessary form of digital and mechanical resistance. It’s messy, it’s frustrating, and often the deck is stacked against you, but it’s the only way to keep these machines out of a landfill for a few more years.
Just remember: if you open the hood, you own the outcome. Check your connectors, respect the electricity, and never trust a "quick fix" that involves bypassing a safety sensor. Your kitchen—and your insurance company—will thank you for it.