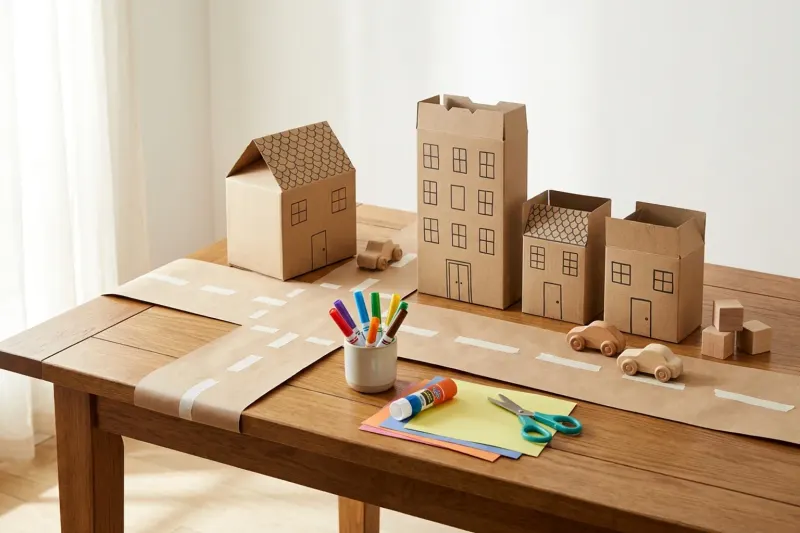
If your recycling bin is full of clean cereal and cracker boxes, you can turn them into a sturdy tabletop town without buying miniature playsets or messy base paints. For children ages 4 to 8, the most practical way to handle glossy branded packaging is to separate the factory seam and turn the box inside out. The raw paperboard interior gives children an unprinted surface for drawing doors, storefronts, and windows while the box lies flat, eliminating caved-in walls and slippery marker ink. Because cutting through stiff paperboard requires firm pressure, adults handle all heavy slicing and utility blades, while children sketch features, stick tape, and plan roadways. Keep direct adult supervision active throughout the project whenever cutting tools and small cutoffs are in the room.
Box Selection and Workspace Safety
Start by selecting clean, dry food packaging such as cereal, pasta, tissue, or cracker boxes. Do not use containers that previously held cleaning agents, detergents, automotive products, or lawn chemicals. If you choose to repurpose paper milk or juice cartons, rinse them thoroughly with warm soapy water and allow them to dry completely to prevent bacterial growth and sour odors. All art materials used for decorating should conform to ASTM D-4236, as required under the Labeling of Hazardous Art Materials Act (LHAMA) and enforced by the U.S. Consumer Product Safety Commission (CPSC). This standard ensures art supplies such as markers, washable tempera, and glue sticks are certified non-toxic for children. Avoid solvent-based permanent markers, aerosol sprays, and industrial adhesives. If younger children or toddlers share the home, workspace safety requires extra care. Federal regulations under 16 CFR Part 1501 define a small part as any object fitting inside a test cylinder measuring 1.25 inches (3.18 cm) in diameter and 2.25 inches (5.71 cm) in length. However, a single dimension cutoff does not guarantee safety on its own, and age alone does not make small items risk-free. Avoid improvised small loose parts such as plastic bottle caps, beads, or bread tags. Sweep trimmed cardboard cutoffs directly into a recycling container before toddlers enter the area.
Related guide: Single-Box Cardboard Builds for Ages 4–8
The Inside-Out Assembly Technique
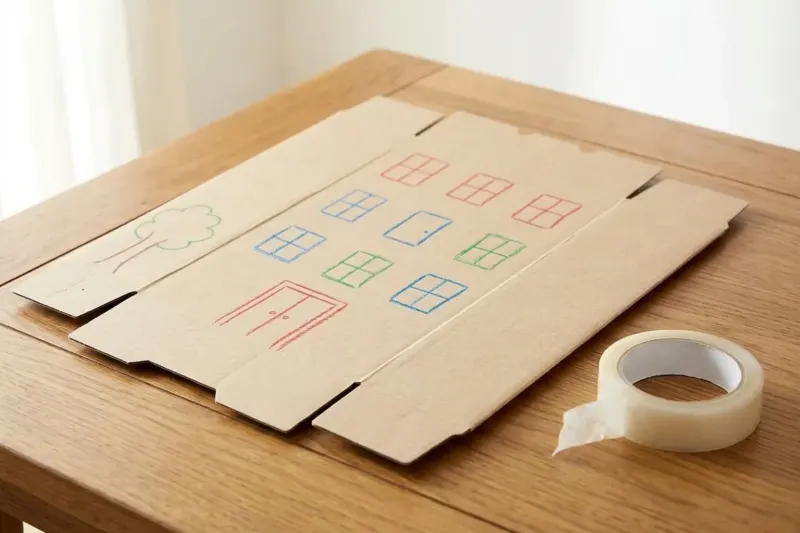
Commercial food cartons usually have a waxy or varnished exterior that repels crayons and washable markers. Rather than applying multiple coats of acrylic primer, invert the packaging to create an instant drawing surface, a method frequently featured in PBS KIDS maker guides. First, open the manufacturer seam by sliding your fingers or a blunt butter knife along the single glued side flap running vertically down the box. The seam will separate with light pressure without tearing the face panels. Next, invert the carton along existing creases by folding the box in the opposite direction along original factory scores. The unprinted brown kraft or gray paperboard now faces out, hiding all logos and providing an absorbent surface. Spread the opened box flat on the table so children can press firmly with crayons, non-toxic colored pencils, or washable markers to draw bricks, store signs, windows, and roof shingles without crushing an assembled box. Finally, rebuild the box by folding it back into its original rectangular prism along the creases. Secure the vertical seam and bottom flaps with 1-inch (2.5 cm) masking tape or paper tape. Leave the top open if you want an accessible interior for toy figures, or tape it closed for structural rigidity.
Related guide: Living-Room Movement Games With No Jumping
Adult Cutting Support and Child Roles
Cardboard packaging requires different cutting tools depending on its thickness. Blunt-tip safety scissors work well for thin construction paper accents, but cutting windows into stiff paperboard causes hand strain and can lead to slipping with young hands. For child tasks, children trace or draw where they want openings, tape tabs together, cut flat construction paper awnings with blunt-tip child scissors, and position buildings on the street map. For adult tasks, adults cut functional openings into the box walls. For a hinged door or drive-through window, lay the cardboard flat on a self-healing mat and cut three edges using a utility knife or sharp shears, leaving one vertical side uncut to act as a hinge. Never allow children ages 4 to 8 to handle utility blades or craft knives. Once the adult completes the cuts and sets the blade aside in a secure location out of reach, children can fold the flap back and use non-toxic markers to add doorknobs or house numbers.
Related guide: 10 No-Prep Indoor Games for Kids Ages 4–8
Grid Layout and Road Construction
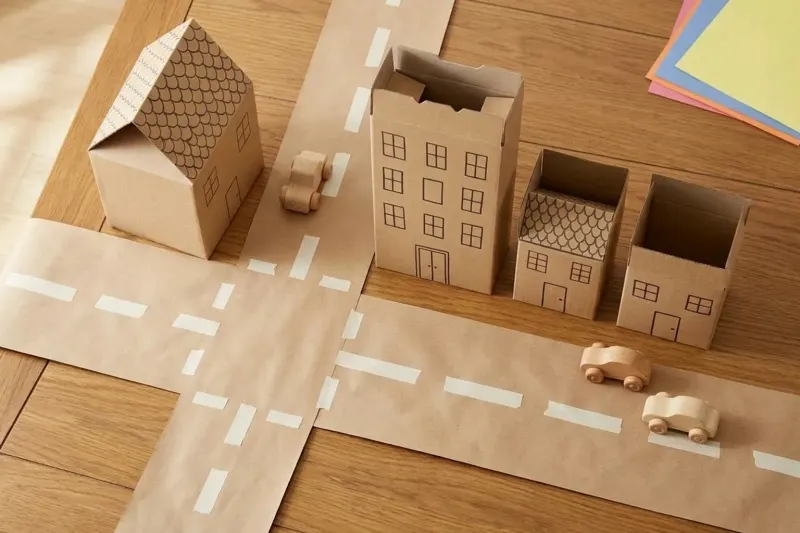
To keep individual buildings from sliding across smooth tables during play, anchor them to a defined paper base. A flattened corrugated shipping box, an opened brown paper grocery bag, or a strip of painter's kraft paper works well. Leave ample roadway space between buildings so toy cars and figures have room to turn corners. Children can press strips of low-tack masking tape directly onto the base paper to indicate vehicle lanes, parking stalls, and pedestrian crossings. Leftover box flaps can be turned into free-standing stop signs or park benches by folding a 1-inch (2.5 cm) tab along the bottom edge and taping it flat to the road base.
Pacing and Tidy Work Habits
Building a full town from scratch can exceed a young child's attention span if attempted all at once. Guidance from Penn State Extension emphasizes aligning project expectations with children's natural stamina rather than rushing toward a finished product. Consider breaking the activity into two shorter segments of 20 to 30 minutes. In the first segment, unfold boxes, turn them inside out, draw architectural details on the flat board, and tape the frames back into shape. In the second segment, roll out the roadway base, arrange the buildings, add tape street lines, and introduce small toy figures or vehicles for pretend play. Keep cleanup simple by setting a cardboard waste bin right beside the workstation before drawing begins. Dropping trimmed corners and tape scraps directly into the bin minimizes loose debris on the floor.
Box Building Options for Small Spaces
| Situation | Consider | Why |
|---|---|---|
| Available surface is a 36x24 inch (91x61 cm) coffee table | Limit setup to 2 or 3 slim cracker or pasta boxes | Compact bases leave at least 4 inches (10 cm) for vehicle pathways without overflowing the table edge. |
| Younger siblings under age 3 are present in the room | Keep boxes whole and avoid loose bottle caps or small decorative cutoffs | Reduces choking risks by eliminating loose items that can fall under furniture or be mouthed. |
| Packaging features glossy or plastic-coated exterior ink | Separate the side seam and invert the box | The raw interior paperboard takes crayons and washable markers smoothly without smearing. |
| Working within a limited 20-minute window | Keep boxes assembled and tape paper construction sheets over the front | Skips unsealing and re-taping steps while still giving a plain surface for quick decoration. |
Hypothetical Two-Building Street Setup
In this hypothetical project setup, an adult and child construct a small neighborhood with an apartment building and a grocery store. Materials include two empty 12-ounce (340 g) cereal boxes, a roll of 1-inch (2.5 cm) masking tape, and a 24x36 inch (61x91 cm) sheet of brown wrapping paper. Total prep takes approximately 10 minutes for adult unsealing and door cutting; building decoration takes about 25 minutes. Cost is under $3.00 assuming standard household art supplies are on hand. The adult separates the manufacturer seam on each box. Working on the flat kraft interior, the child sketches windows, signage, and brick lines with non-toxic markers. The adult cuts three edges of a 2x3 inch (5x7.5 cm) door on a cutting mat. The pair re-tapes the boxes into rectangular shapes and arranges them along the upper portion of the 90x60 cm paper mat, positioned 30 cm apart to frame a central pedestrian walkway and park area, with a wide masking tape roadway running horizontally below both buildings at a depth of 32 cm.
- Apartment Box (Inside-Out)
- Market Box (With Hinged Door)
- Roadway & Vehicle Lane
- Pedestrian Walkway & Park
When this approach is not a good fit
This project is unsuitable if children are left unattended with utility blades, if packaging previously contained household cleaners or raw animal foods, or if small loose items and scraps are left accessible to children under age 3.
PUT THIS GUIDE TO USE
Find an activity for your family
Sources & further reading
- CPSC Art Materials Safety Guidance
- CPSC Labeling of Hazardous Art Materials Act (LHAMA)
- PBS KIDS Cereal Box Cityscape
- NAEYC Making and Tinkering at Home
- Penn State Extension Play Safety
AI-assisted writing and concept images. Sources and automated checks support the process; an adult should check materials and adapt activities to their child.
How we create our guides · Suggest a correction