
If your Breville Barista Express grinder has seized, stop forcing the dial. Unplug the machine, empty the hopper, and remove the top burr by rotating the wire handle clockwise. Clear the impacted coffee grounds, vacuum the chamber, reset the adjustment dial to the coarsest setting, and reassemble carefully to prevent further mechanical stress.
The Anatomy of a Grind Stall: Why the Barista Express Isn't Bulletproof
The Breville Barista Express (BES870XL) is a marvel of consumer-grade engineering, but it exists in a precarious space between "prosumer" accessibility and "disposable" appliance economics. I have spent fifteen years watching these machines arrive on my bench, often with the same pathetic clicking sound—the telltale sign of a motor trying to turn a burr assembly jammed with compressed espresso pucks.
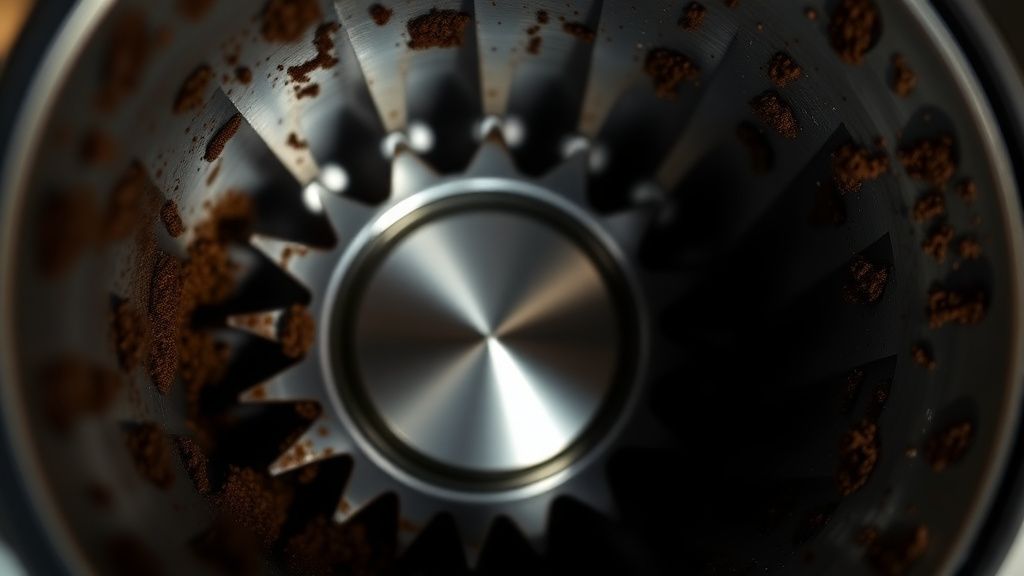
The grinder in this unit is a conical burr set driven by a gear-reduction motor. When you hear that "click-whirr" struggle, it is usually because the internal torque limit has been exceeded. This happens when oily beans, a faulty burr alignment, or—most commonly—a change in grind setting from fine to coarse while the machine is off, causes a "bridge" of grounds to lock the burr in place.
Step 1: The Safety Purge and Hopper Extraction
Before you touch a screwdriver, pull the plug. I’ve seen enough "home repairs" turn into electrical faults because someone tried to poke a paperclip into the chute while the machine was live. Remove the bean hopper—unlock it by turning the collar counter-clockwise. You will likely find a compact mass of beans wedged at the throat. Do not just shake the machine. Turn it upside down over a bin to clear the loose beans. If the beans are oily (typical of dark roasts), they will have formed a sticky residue that acts like glue on the burr housing.
Step 2: The Art of Burry Extraction (The "Wire Handle" Trap)
The top burr is held by a wire handle that flips up. Here is the operational reality: that handle is flimsy. If you pull it at a weird angle, it bends. If it bends, the burr sits unlevel. If the burr sits unlevel, your extraction will be uneven forever. Pull the handle straight up with steady, even pressure. If it won't budge, the jam is physically pinning the burr against the outer ring. Do not pry it with a screwdriver; you will scratch the stainless steel seating, and your machine will never seal correctly again.
Step 3: Clearing the Chute and the "Vacuum" Myth
People always reach for a vacuum. A standard shop vac is fine, but avoid sticking the nozzle directly into the plastic housing. Static electricity buildup in these units is notorious; I have seen people zap the control board by creating an ESD (Electrostatic Discharge) event while vacuuming plastic parts. Use a dry, stiff-bristled brush to clear the compacted grounds. You need to clear the exit chute—that narrow tunnel leading to the portafilter cradle. If that tunnel is blocked, the grinder creates backpressure, forcing grounds up into the motor housing.
Step 4: The Coarse Reset Strategy
Once you have cleared the debris, rotate the grind size dial to its coarsest setting before you put the burr back. Why? Because the "fine" setting places the inner and outer burrs in closest proximity. If you put the burr back in and lock it while the dial is set to "Fine," you risk crushing a stray rock or a stubborn bean fragment, causing an immediate re-jam upon startup.
Step 5: The "Dry Run" Re-Calibration
Once the burr is seated and the hopper is locked, run the grinder empty for two seconds. If it sounds "free," you are safe. If it sounds labored, stop immediately. You have a residual obstruction. Do not try to "grind through" a jam. The thermal fuse on these motors is cheap; once it pops, you are looking at a full motor assembly replacement, which often costs more than a entry-level standalone grinder.
Real Field Reports: The "Oily Bean" Controversy
The community on r/espresso and various enthusiast Discord servers often clashes over the "Breville Grinder Limitations." The reality is, the BES870XL is not designed for "light roast" beans that are hard as marble, nor is it fond of "extra oily" beans that coat the chute.
- Case Study A: A user reported that their grinder seized every time they used a specific high-end, light-roast Ethiopian bean. Upon teardown, the motor simply lacked the torque to fracture the density of those specific beans at a fine setting. The solution wasn't a repair—it was a change in bean density/roast level.
- Case Study B: A user in a GitLab maintenance thread documented a persistent issue where grounds were leaking into the internal electronics. This happens when the plastic collar that seals the burr housing warps due to heat. If your grinder is constantly jamming, it may not be the beans; your seal might be cooked.
The Operational Reality of the "Integrated" Grinder
The decision to put a grinder inside the machine is a marketing triumph but an engineering nightmare. It creates an ecosystem where the heat of the boiler (which warms the group head) is transferred to the grinder burrs. This causes the coffee oils to become tacky, accelerating the "jam" cycle.
Many experts argue that the Barista Express would be a vastly superior machine if the grinder were external. However, the "all-in-one" aesthetic drives sales. As a technician, I see the friction: users want the convenience, but they don't want the maintenance burden of a complex, heat-soaked grinding mechanism.
Counter-Criticism: Why Most "Repairs" Fail
Most users fail to fix their grinder because they treat it as a "cleaning" issue rather than an "alignment" issue. If you’ve jammed your grinder multiple times, the plastic adjustment collar—the part that moves the burrs—often develops microscopic cracks. You can clear the jam, but the burr will continue to "wobble" under load. This leads to inconsistent grind particle distribution (fines vs. boulders), which ruins your shots long after the machine "works" again.
If you have tried the 5-step fix and the machine still sounds "off," you are likely dealing with a worn-out plastic collar, not a simple blockage. Replacement collars are available, but they are a tedious, multi-hour installation requiring a total internal tear-down.
Q: Should I use a grinder cleaning tablet to fix a jam?
Never. If the grinder is already jammed, the tablet will only add more debris to the blockage. Cleaning tablets are for preventative maintenance only. Use them when the grinder is functioning normally to remove oil buildup, not when the motor is stalled.
Q: Why does my machine make a high-pitched whine instead of a click?
That whine is the motor winding up without load, or worse, the internal gear assembly slipping. If you hear a whine, the drive gear may have stripped teeth. This is a terminal failure for the integrated grinder and usually requires a professional motor assembly swap.
Q: Does the grind setting dial need to be in a specific position to remove the burr?
Ideally, yes. Setting it to the coarsest setting reduces the tension on the burr housing. Some versions of the Barista Express have a "zero point" that is easier to align if the dial is set to a specific number. Check your specific manual, but "Coarse" is the universal safe zone.
Q: How often should I perform this deep clean?
If you are using supermarket beans with high oil content, every 3-4 weeks. If you use light-to-medium roasts that are dry to the touch, you can push it to every 2-3 months. The moment you hear the motor struggle, perform the steps above—do not wait for a complete hard-stop.
Q: Is it true that I should only adjust the grind setting while the machine is running?
Absolutely. This is the #1 cause of jams. If you adjust while the machine is off, you are forcing the burrs to crush or displace beans that are currently resting between them. Always adjust while the burrs are spinning to ensure the teeth are moving rather than grinding against each other statically.